Most people buying a custom cat collar are really buying one thing: a way to put their cat’s name and a phone number somewhere safe, or, for a shelter or brand, a way to put a logo on a collar that clients keep. The decoration method you choose decides what you can actually put on the collar, how long it survives a cat’s daily life, and what it costs per piece. Here is how the common methods work and how to specify the one that fits your order.
Start with the surface you are decorating
A cat collar is a narrow strip of webbing, usually 3/8 inch wide, with a breakaway safety buckle that releases if the collar snags. That width is the canvas, and it is small, which is why most personalization is short text rather than detailed art. Sizing matters before decoration because it sets how much room the lettering has. A kitten collar adjusts through roughly a 6 to 8 inch neck range, a typical adult cat sits around 8 to 12 inches, and large breeds run larger still. Measure the cat’s neck snug, leave room for two fingers, and set an adjustable collar near the middle of its range so it still fits as the cat fills out.
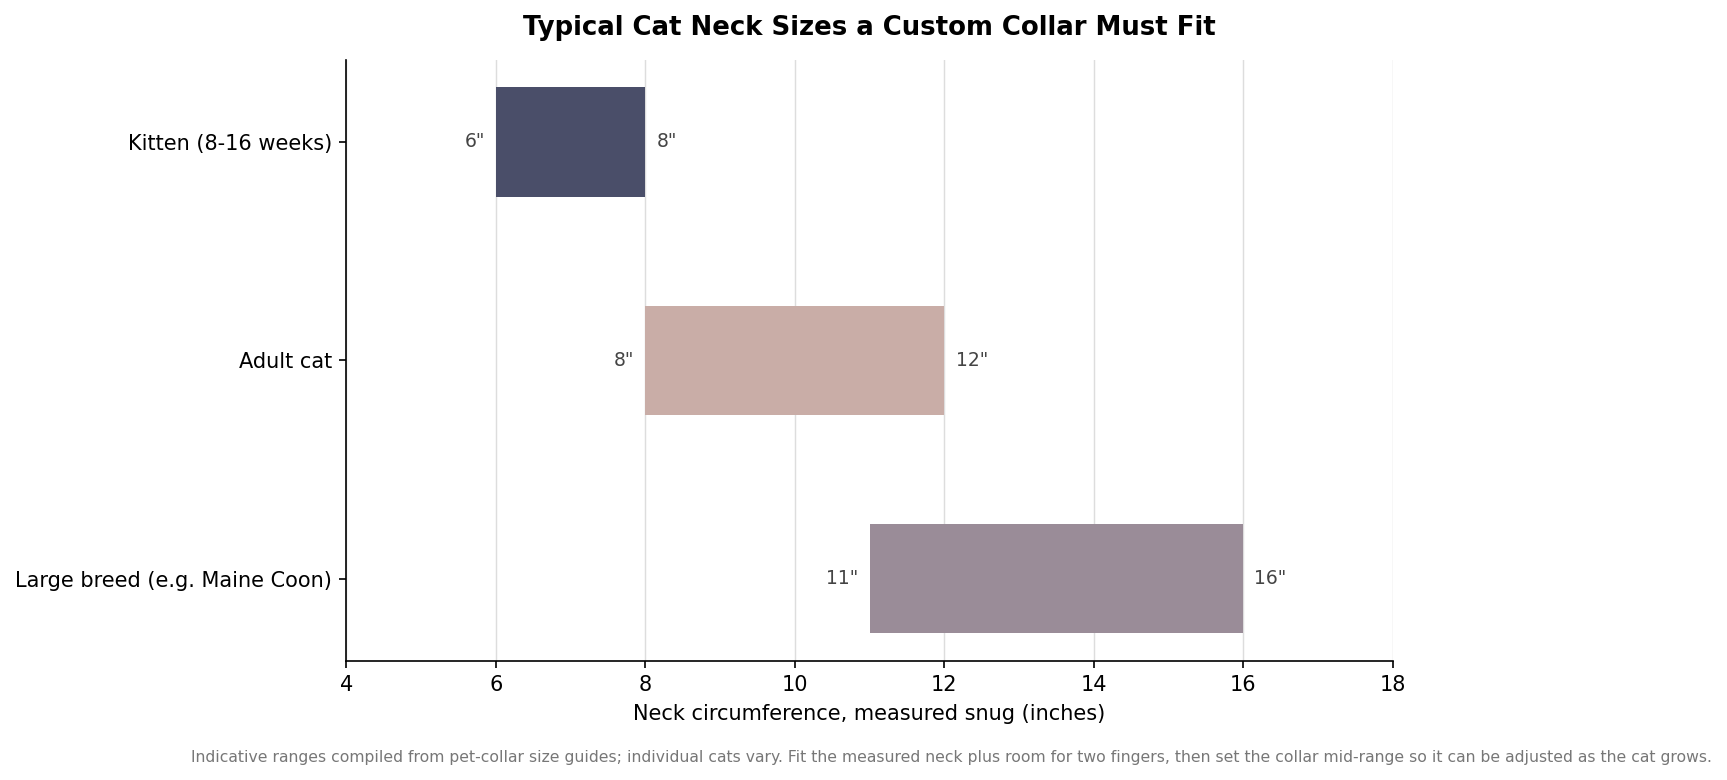
Because the printable run of webbing between the buckle and the slide is short, most suppliers cap embroidered or printed text at around 21 characters, enough for a name and a ten-digit number if you keep it tight. Plan the exact text before you order, since abbreviations and spacing decisions are much easier to make on paper than after a production run.
Direct embroidery: the classic ID method
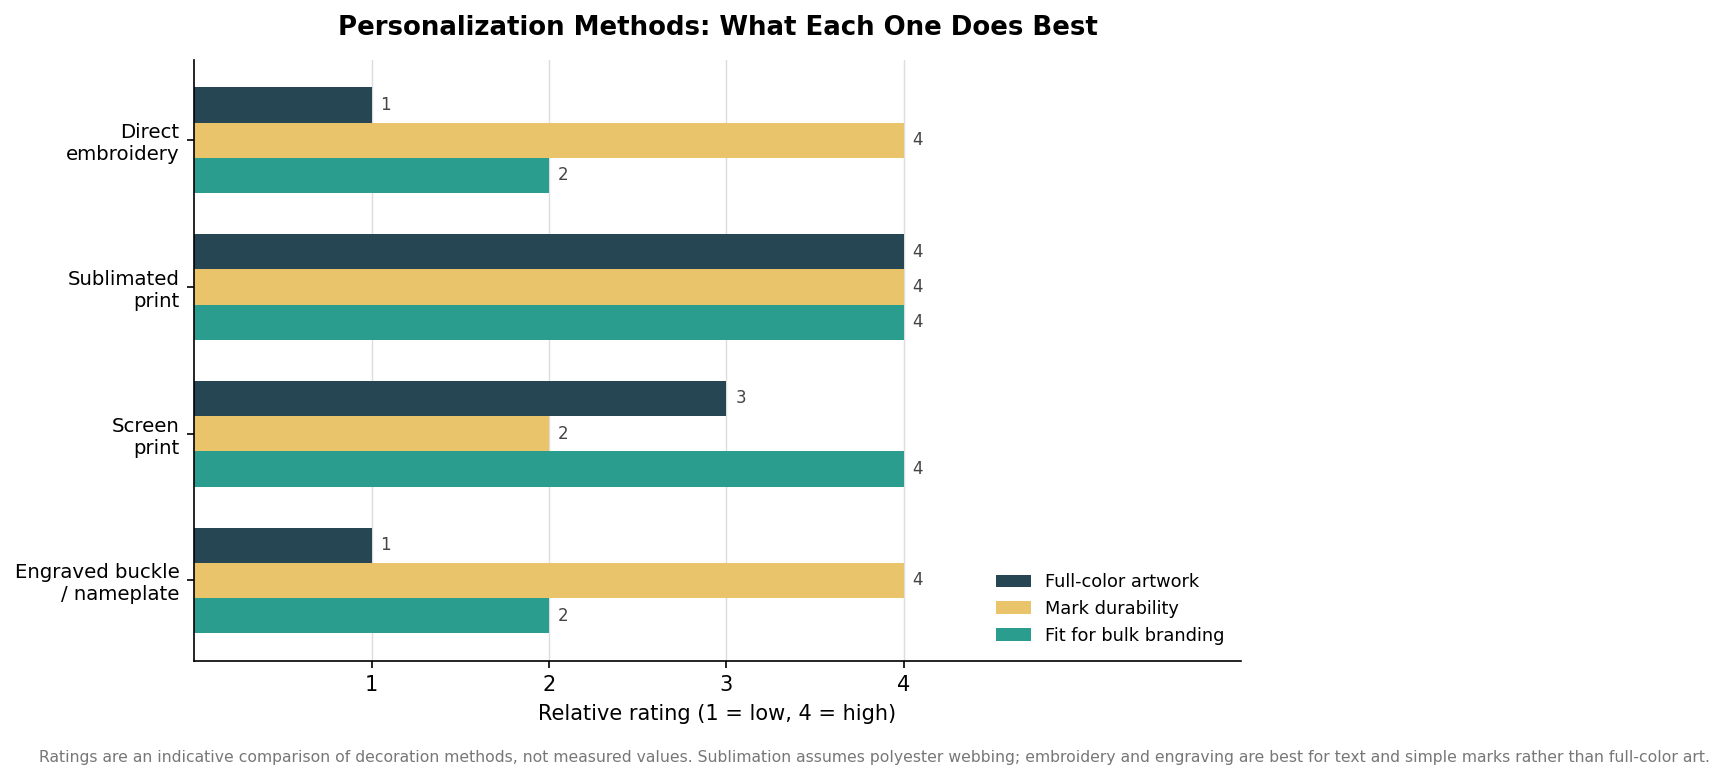
Embroidery stitches the name and number straight into the webbing with colored thread, and it is the default for a reason. The lettering is part of the collar, so it does not peel or fade the way a surface print can, it survives machine washing, and it reads clearly even on a moving cat. Suppliers typically offer a range of thread colors, often around fifteen, so the text can contrast with the webbing. The trade-off is that embroidery is a text medium: it handles names, numbers and simple monograms well but cannot reproduce gradients, photos or fine multicolor logos on a 3/8 inch strip. If your goal is durable, legible identification, embroidery is usually the right call.
Printed and sublimated webbing: when you need color
When the collar itself is the design, printing is the answer. Dye sublimation prints full color into polyester webbing, turning the dye into a gas that bonds with the fiber, so patterns, gradients and repeating logos become part of the strap rather than a coating on top. That makes it the method of choice for patterned fashion collars and for brands that want an all-over look. The catch is material: sublimation needs polyester, not the nylon used for many plain ID collars, so the webbing choice and the decoration choice are linked. For simpler bulk branding, screen printing lays spot-color text or a logo onto the webbing surface at low per-unit cost once the screens are made; it is economical at volume but the ink sits on the surface and can show wear over time, so it suits promotional runs more than lifetime ID.
Engraved buckles and slide-on nameplates: keeping ID off the fabric
Not all identification lives on the webbing. An engraved buckle or a slide-on metal nameplate carries the name and number on hardware instead, laser-etched so it will not rub off. This keeps the fabric clean for a printed pattern, gives a more premium look, and avoids the slight bulk of stitched thread. It is also the route for modern add-ons such as slim nameplates and holders sized for a tracking tag. The limitation is space and legibility on a small plate, and metal hardware adds a little weight and cost, so it tends to appeal to boutique buyers and owners who want the collar to look like jewelry rather than utility gear.
Match the method to the order, not the other way around
The right method follows the job. For a single pet owner who wants reliable ID, embroidered name and number on a breakaway nylon collar, ideally with a reflective stripe and a removable bell, is hard to beat on durability and value. For a shelter, groomer or retail brand ordering in quantity, a screen-printed or sublimated logo spreads the setup cost across the run and turns every adopted or groomed cat into a small piece of marketing. For a premium or boutique line, an engraved buckle or nameplate on patterned webbing signals quality and supports a higher price. The chart below sums up what each method does best so you can shortlist before requesting samples.
Whatever you choose, two habits prevent the most common regrets. Confirm the exact character count and spelling on a digital proof before production, because a misspelled name or a dropped digit defeats the whole purpose of an ID collar. And never let decoration override safety: the breakaway buckle is the feature that lets a snagged cat escape, so keep it regardless of how the collar is decorated, and treat the collar as a backup to a microchip rather than a replacement for one. Get those right and the method is simply a question of how much color, durability and polish you want for the price.